Absolute Ripple
  • Absolute Ripple
  • Contact

Block Based Completion Handler

11/8/2013

0 Comments

 
If you have used some of iOS methods that uses block you would probably agree that they are quite wonderful to use. I am talking about methods such as these:
[UIView animateWithDuration:5.0
                     animations:^{
                         // some code
                     } completion:^(BOOL finished) {
                         // some code
                     }];

[array enumerateObjectsUsingBlock:^(id obj, NSUInteger idx, BOOL *stop) {
        // some code
    }];

Blocks enable you to write more compact and flexible codes that can be easily reused in your programs. It does take awhile to get use to the most weird looking syntax though.

Then you start to think, wouldn't it be nice if I could use a block based completion handler in some of my methods. But how? It looks so confusing and you just don't know where to begin. The block syntax makes it appears harder than it really is. The basic pattern is simple.

The Pattern

1. Typedef the block
typedef void (^NameOfYourCompletionHandler)(NSString *name, BOOL finished);
This block calls 'NameOfYourCompletionHandler'. It has two arguments - an NSString and a BOOL. Obviously, you can have more or less arguments to suit your situation.

2. Add a property
@property (nonatomic, copy) NameOfYourCompletionHandler nameOfYourCompletionHandler;
This is just like how you define any other property. i.e. preceding the name of the property with the type (i.e. NameOfYourCompletionHandler here). The name of the property can be whatever you like. If the code uses only one property of this block type, it is generally preferable to keep the property name the same as the name of the type (and lower casing the first character) to make it easier to follow.

3. Create an instance method (not a class method) that takes the block as one of its argument
- (void)doSomeTask:(NSString *)taskName withCompletion:(NameOfYourCompletionHandler)completionBlock
{
    self.nameOfYourCompletionHandler = completionBlock;
    // code to do something
}
The line self.nameOfYourCompletionHandler = completionBlock is important as this copies the completionBlock code to the instance variable so that it can be invoked later.
As noted above, this cannot be a class method as a class method would have any instance variables, such as the nameOfYourCompletionHandler here. If you must use a class method, you need to use static storage instead.

4. Call the completion block when you want to invoke it.
self.nameOfYourCompletionHandler(@"some name", YES);
This simply calls the completion block code and passes in the arguments.

This is all you need. And you can use the block based instance method like this, assuming you are invoking it within the same class:
[self doSomeTask:@"some task name" withCompletion:^(NSString *name, BOOL finished) {
        // code you want to perform
        // i.e. code you want to execute when the completion block is invoked under (4) above.    
    }];

       
Looking around online you will come across slight variation to the above, but the underlying pattern is the same. Some don't use typedef, and some don't use property (using static storage instead).

Without Typedef
Without using typedef, (2) would look like:
@property (nonatomic, copy) void (^nameOfYourCompletionHandler)(NSString *, BOOL)

And (3) would look like:
- (void)doSomeTask:(NSString *)taskName withCompletion:(void(^)(NSString *name, BOOL finished))completionBlock
{
    self.nameOfYourCompletionHandler = completionBlock;
    // code to do something
}

The rest would be the same.

Typedef makes the code looks cleaner (i.e. less weird syntax). However, it is just a personal preference/ coding style thing.

Using Static Storage
If you want to use block with class method you can do so with static storage.
Instead of (2), you would declare the static storage as follows in your implementation file:
static NameOfYourCompletionHandler _nameOfYourCompletionHandler;
And (3), would look like:
+ (SomeClass*)doSomeTask:(NSString *)taskName withCompletion:(NameOfYourCompletionHandler)completionBlock
{
   
_nameOfYourCompletionHandler = [completionBlock copy];
    // code to do something
}

And (4) becomes:
_nameOfYourCompletionHandler(@"some name", YES);

Other Useful Reference About Using Block
- Working with Blocks
- Using Blocks in iOS 4: The Basics
0 Comments

Using IOS Storyboard Segues

2/8/2013

1 Comment

 
Using storyboard to set up the design of the various views is the way to go in most apps these days for iOS app development. The friendly graphical interface makes it quite easy to use. After using it for awhile, you wonder why you would ever want to go back to a code base approach (although there may be some situations where you may still want to do things purely in code).

Segues are used when you want to:
1. Go to another view controller - it does this by instantiating a view controller you set up and link to in the storyboard. The new view controller can be presented in different ways: modal, push (when embedded within a UINavigationController), popover, or embedded (such as in a container view).
2. Go back to a view controller that directly or indirectly presents the current view controller. This is the unwind segues.
3. Pass values or objects between view controllers as you are going to a view controller or unwinding to a previous view controller. Using the segues to pass values or objects between view controllers is very convenient, especially passing values or objects back to a prior view controllers. Without using segues, passing values or objects back to a prior view controller would require the use of protocol and delegates or some notification services. Segues often provide a more elegant and simpler (i.e. less code) way to achieve this.

Setting up the actual storyboard in Xcode is easy enough, but getting your code to work with it or talk to it is something else; it is not hard, you just need to know how. There are many very useful tutorials online about various aspect of it. The aim here is not to recreate those tutorials. This is a brief summary of the various things that are commonly performed and codes snippets that are often used.

Going to Another View Controller

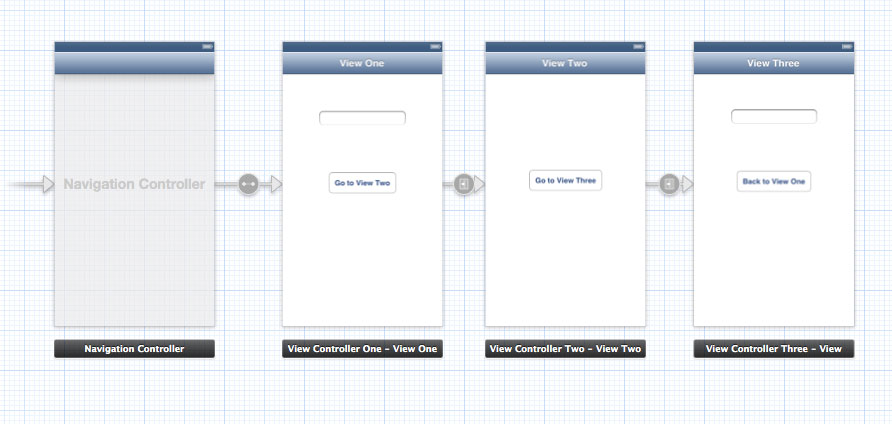
The example here assumes the following setup:
  • There are three view controllers - ViewControllerOne, ViewControllerTwo  and ViewControllerThree.
  • These are all embeded within an UINavigationController.
  • Clicking a button on ViewControllerOne will go to ViewControllerTwo via a push segue. Likewise, clicking a button in ViewControllerTwo will go to ViewControllerThree via a push segue.
The Storyboard looks like this:
Storyboard
The approach described below also work without the UINavigationController and where modal segues are used to go from ViewControllerOne to ViewControllerTwo and from ViewController Two to ViewControllerThree.

Creating the segues: control drag from the relevant button to the view controller you want to show.
Code in the source view controller: (i.e. the controller you are originating from)
- (void)prepareForSegue:(UIStoryboardSegue *)segue sender:(id)sender
{
    if ([segue.identifier isEqualToString:@"ViewControllerTwoSegue"]) {
        ViewControllerTwo *vc2 = (ViewControllerTwo *)segue.destinationViewController;
        vc2.name = self.textField.text;
    }
}

where:
- 'ViewControllerTwoSegue' is the name of the segue set in storyboard
- 'ViewControllerTwo' is the class of the destination view controller (i.e. the view controller you are going to)
 
Passing values or objects: set the relevant property in the destination view controller inside the prepareForSegue method
In this example, ViewControllerTwo has a public property called 'name' (an NSString in this case). Here it is set to the value of a text field called 'textField' in ViewControllerOne.

Note: when the prepareForSegue method is called, the views in the destination view controller may not have been fully instantiated yet. This means it is often not a good idea to directly set the values of views (such as a text filed or label) in the destination view controller inside the prepareForSegue. e.g. if View Controller Two has a text field called 'textField', this may not work: vc2.textFeild.text = self.textField.text, or may work unreliably. It is often better to set the value of a property in the destination view controller and then set the text filed or label inside viewDidLoad of View Controller Two.

Going to Another View Controller Conditionally

Most of the time you want to go directly to a view when a button is clicked, but this is not always the case. Sometimes you may want to go to a view only under certain condition. Obviously, one way is to disable the button unless the condition is satisfied, but another is to stop the segue.
Stopping the segue: return NO for shouldPerformSegueWithIdentifier:
The code:
- (BOOL)shouldPerformSegueWithIdentifier:(NSString *)identifier sender:(id)sender
{
    if ([identifier isEqualToString:@"ViewControllerTwoSegue"]) {
        return NO;
    }
    return YES;
}

where:
- 'ViewControllerTwoSegue' is the name of the segue set in storyboard

This method is invoked automatically by iOS before it calls prepareForSegue. This allows you to put conditional codes in it, to determine whether to actually perform the segue. The above code will prevent the user from going to ViewControllerTwo ever. This is probably not what you want to do all the time. In real code, you need to change 'return No' to something else that return NO or return YES based on some conditions that suit your app.

Passing Values or Objects

Values or objects can be passed along to the view controller that you are going to (i.e. the destination view controller) by simply setting one or more public property in the destination view controller, such as the 'name' property in the example above.
The above code only works in situation where the view you are going to is a UIViewController. The above won't work if you are going to a UINavigationController. Consider, for example, you start from a  ViewController and the segue is connected to another view controller (say ViewControllerOne) that is itself embedded within a UINavigationController. The code above won't work because the object return by the destinationViewController property of the segue is not a UIViewController; it is in fact a UINavigationViewController. For this type of setup, use this code inside prepareForSegue:

    if ([segue.identifier isEqualToString:@"ViewControllerOneSegue"]) {     
            if ([segue.destinationViewController isKindOfClass:[UINavigationController class]]) {
                UINavigationController *navController = segue.destinationViewController;
               
                ViewControllerOne *vc1 = [navController.viewControllers objectAtIndex:0];
                vc1.name = self.textField.text;
            }       
        }

where:
- 'ViewControllerOneSegue' is the name of the segue set in storyboard
The above code snippet also did a bit of introspection to confirm that the destination view controller is in fact a UINavigationController, but this is optional and not required if you know that the segue will always go to a UINavigationController.


Going Back To Another View Controller - aka Unwinding

With segues we can go back to another view controller just as easy. Not only can we go back to the previous view controller (i.e. the view controller that was shown immediately before the current one), we can go back to any other view controllers. This is done via the unwind segue.

This mechanism is only to go back to one of the previous view controller, hence the name unwind segue; it is not design to go to any other view controller that you may have on the Storyboard. Unlike other segues, unwind segues do not instantiate a view controller; they go to an existing view controller only. There is no limit to how far back you can unwind, but the view controller that you are going back to must be one that lies along the chain of view controllers leading to the presentation of the current view controller.

Setting up the unwind segue is slightly less intuitive than setting up a segue that go to another view controller. The steps are:
1. Implement an IBAction method in the view controller that you want to unwind to;
2. Link this method to a button in the view that you want to unwind from.

The following code example demonstrates going from ViewControllerThree to ViewControllerOne by clicking a button in ViewControllerThree.

Add an IBAction: (put this inside the view controller that you want to return or unwind back to)
    - (IBAction)backToViewControllerOne:(UIStoryboardSegue *)segue
    {
        NSLog(@"from segue id: %@", segue.identifier);
    }

This method essentially provides the means for ViewControllerThree to talk to ViewControllerOne. The method name (i.e.'backToViewControllerOne'  here) can be anything you want so long that it takes one argument of the type UIStoryboardSegue and the return type is IBAction This is all that is required in terms of code (you don't need the NSLog of course). Additional codes are only required if you want to pass values or objects back.

Link it up in StoryBoard:
Unwind segue
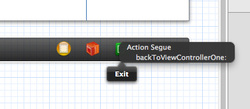
In the Storyboard, assuming you have a button that you want to click to start the unwind action, control-drag from that button to the green 'exit' icon on the bottom of the view controller that you are unwinding from. In the example here, it is ViewControllerThree. A popup menu will appear, and one of the selection would be the name of the IBAction method. Here, it would be backToViewControllerOne.

Sometimes, however, the method name you have entered just won't show up. And this makes it somewhat confusing especially when you first learn to use this unwind segue thing. Not sure why this is the case; but it sure feels like a bug in Xcode. The fix is to simply close the project and reopen it; occasionally, restarting Xcode may also be required.

Once it is all link up, it should work. In the example here, clicking the button will then take you directly back to ViewControllerOne.

Passing values or objects back: simply access the relevant public property in the view controller you are returning from (referred to as the source view controller).
For example, you can use code like:
    - (IBAction)backToViewControllerOne:(UIStoryboardSegue *)segue
    {
        NSLog(@"from segue id: %@", segue.identifier);
        if ([segue.sourceViewController isKindOfClass:[ViewControllerThree class]]) {
            NSLog(@"from view controller three");
       
            ViewControllerThree *vc3 = segue.sourceViewController;
            self.textField.text = vc3.name;
        }
    }

This example simply sets the value of the text field called textField in the current view controller (ViewControllerOne) to the value of a property called 'name' in ViewControllerThree.

The above code uses introspection to determine which view controller the segue is returning from. Introspection is not essential, but can be handy for writing generic code that can handle unwinding from multiple view controllers.

If you need to set the value of the relevant property in ViewControllerThree to a particular value, this is can be done by the prepareForSegue method in ViewControllerThree. Suppose you want to set the property called 'name' above, you can do the following:
    - (void)prepareForSegue:(UIStoryboardSegue *)segue sender:(id)sender
    {
        if ([segue.identifier isEqualToString:@"Vc3ToVc1Segue"]) {
            self.name = self.textField.text;
        }
    }

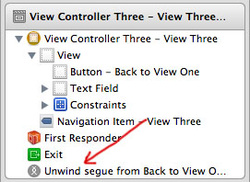
Document outline with unwind segue
where:
- Vc3ToVc1Segue is the name of the unwind segue. Setting the name of this segue gets a bit confusing. You set the name in the Storyboard by clicking on the segue in the so called 'Document Outline' on the left hand side of the Storyboard. This segue is not shown in the diagrammatic representation. Once the unwind segue is linked, it will be shown in the Document Outline, usually beginning with the words "Unwind segue from...". Clicking on that will allow you to set its name in the attribute inspector.

This simply sets the name property to the value in the text field called 'textField'. Together with the code in the backToViwControllerOne method above, this passes the value of the text field in ViewControllerThree back to ViewControllerOne via the unwind segue. This approach is much simpler than a protocol and delegate based approach.

1 Comment

Grand Central Dispatch

23/7/2013

0 Comments

 
Grand Central Dispatch (GCD) is a powerful multitasking technology in iOS. I don't pretend to know all the ins and outs about GCD, and haven't really use it much. Mostly, I tend to use it for just one thing: to prevent the main thread from blocking due to time consuming activities, such as downloading things from the network or serious image processing.
The code typically looks something like:
dispatch_queue_t nameOfQueue = dispatch_queue_create("SOME_NAME", NULL);
    dispatch_async(nameOfQueue, ^{
        /* codes to be performed in the other queue */

        /* eg. downloading something  */
        dispatch_async(dispatch_get_main_queue(), ^{
            /* codes to be performed in main thread, usually UIKit stuff */
            /* e.g. update the UI based on the data you have downloaded */
        });
    });


Note:
- the NULL in dispatch_queue_create means this is a serial queue, as opposed to a concurrent queue
- dispatch_get_main_queue() is used to get the main queue
- dispatch_get_current_queue() is used to get the current queue

It is important to dispatch back to the main queue if you want to run UIKit stuff as they are mostly not thread safe. This is what the second dispatch_async() is doing above. A few exceptions are: UIImage, UIFont, UIBezierPath, drawing things using Core Graphics. (Not sure if there are others.)

See the Apple Documentation.
0 Comments

Text Color: Animating color change and making the color change relative to other variable

6/7/2013

0 Comments

 
In case the title is a bit unclear, this post is about two things:
1. Outline a few ways in which the color of UILabel can be changed gradually from one color to another color over a fixed period of time. The examples below will change the color from Red to Blue over 5 seconds.
2. Describe an approach to make the color varied in response to the value of another variable.

Method 1: Using the animation method of UIView
A very simple approach is to use the transitionWithView:duration:option:animations method of UIView.
The following assumes you have a UILabel called 'textLabel' in your storyboard and that you have established an IBOutlet to it. That is, somewhere in your @interface file there should be a line saying something like:
    @property (weak, nonatomic) IBOutlet UILabel *textLabel;
(The best way to make sure this is all link up properly is to use the control-drag approach.)

Then you simply add this to viewDidLoad:
    [self.textLabel setTextColor:[UIColor redColor]];

And add the following code to viewDidAppear:
    [UIView transitionWithView:self.textLabel
                      duration:5.0
                       options:UIViewAnimationOptionTransitionCrossDissolve
                    animations:^{
                        [self.textLabel setTextColor:[UIColor blueColor]];
   
                }
                    completion:nil];

This is it.

Method 2: Using Core Animation CATextLayer
A more complex approach is to use Core Animation CATextLayer.
First, add the QuartzCore framework and then #import it by adding the following to the top of your file (in either the .h or .m)
    #import <QuartzCore/QuartzCore.h>
Next, add the following method:
    - (void)animateTextLayer
    {
   
    CGFloat animationDuration = 5.0;
   
   
    CATextLayer *textLayer = [CATextLayer layer];
   
    [textLayer setString:@"Foo"];
   
    [textLayer setForegroundColor:[UIColor redColor].CGColor];
   
     [textLayer setFontSize:50];
 
       [textLayer setFrame:CGRectMake(100, 150, 100, 60)];
   
     [[self.view layer] addSublayer:textLayer];
   
   
     CABasicAnimation *colorAnimation = [CABasicAnimation
                                        animationWithKeyPath:@"foregroundColor"];
   
    colorAnimation.duration = animationDuration;
   
    colorAnimation.fillMode = kCAFillModeForwards;
   
    colorAnimation.removedOnCompletion = NO;
   
    colorAnimation.fromValue = (id)[UIColor redColor].CGColor;
   
    colorAnimation.toValue = (id)[UIColor blueColor].CGColor;
   
    colorAnimation.timingFunction = [CAMediaTimingFunction
                                     functionWithName:kCAMediaTimingFunctionLinear];
   
    [textLayer addAnimation:colorAnimation
                     forKey:@"colorAnimation"];
    }
Finally, call this method in viewDidLoad:
    [self animateTextLayer];

Method 3: Using NSTimer and Computing the color
The following assumes that the UILabel has been created as described in Method 1 above.
First, create a variable p by adding this under @implementation:
{
    CGFloat p;
}


Next, add the following methods:
- (UIColor *)createColorWithColorOne:(UIColor *)colorOne ColorTwo:(UIColor *)colorTwo andProportion:(CGFloat)proportion
{
    CGFloat colorOneRed, colorOneGreen, colorOneBlue, colorOneAlpha;
    [colorOne getRed:&colorOneRed green:&colorOneGreen blue:&colorOneBlue alpha:&colorOneAlpha];
   
    CGFloat colorTwoRed, colorTwoGreen, colorTwoBlue, colorTwoAlpha;
    [colorTwo getRed:&colorTwoRed green:&colorTwoGreen blue:&colorTwoBlue alpha:&colorTwoAlpha];
 
    CGFloat newRed = colorOneRed + (colorTwoRed - colorOneRed) * proportion;
    CGFloat newGreen = colorOneGreen + (colorTwoGreen - colorOneGreen) * proportion;
    CGFloat newBlue = colorOneBlue + (colorTwoBlue - colorOneBlue) * proportion;
   
    return [UIColor colorWithRed:newRed green:newGreen blue:newBlue alpha:1.0];   // assuming alpha is constant
}

- (void)changeColor:(NSTimer *)timer
{
    self.textLabel.textColor = [self createColorWithColorOne:[UIColor redColor]
                                                    ColorTwo:[UIColor blueColor]
                                               andProportion:p];
    p +=0.1;
    if (p >= 1.0) {
        [timer invalidate];
        timer = nil;
    }
}

And in viewDidLoad add:
    p = 0;
    NSTimer *timer = [NSTimer scheduledTimerWithTimeInterval:0.5
                                                      target:self
                                                    selector:@selector(changeColor:)
                                                    userInfo:nil
                                                     repeats:YES];


As said above, this changes the color of the label from red to blue in 5 seconds. You can customise the duration and the smoothness of the color transition by altering the TimeInterval of the NSTimer and the increment amount for the variable p in the changeColor: method.

Making the color vary with reference to another variable

A quick word about the method (UIColor *)createColorWithColorOne:(UIColor *)colorOne ColorTwo:(UIColor *)colorTwo andProportion:(CGFloat)proportion. The logic behind it is based on the equation of a line in 3D space. One way to express a color is by reference to its three color components: red, green and blue. These three values can be represented by a point in 3D space. Given two colors we have two points. And with two points we can construct a line, which can be expressed in the form of a parametric equation (this is essentially what the newRed, newGreen, newBlue lines above come down to). A feature of a parametric equation that is most useful here is that it allows us to express the coordinates by reference to another variable, that is, the variable called 'proportion' here. So by changing this vale we can get different color values between colorOne and colorTwo. (Note: proportion is between 0.0 and 1.0 only. When proportion = 0, the color is red; when proportion = 1.0, it is blue.)

The example here simply increment the proportion gradually over a period of time so that the color animates from red to blue. This is not the only use of this method. Animating color changes between two colors over a fixed duration can be achieved using method 1 and 2, which are arguably much simpler too. The method described here allows you to generate a color that lies between two other color by reference to something else. For example, red can represents a maximum temperature and blue can represent a minimum temperature. Using this method you can get a color as the temperature varies between the minimum and maximum.

With a bit more work, the code can be modified to use more than two colors, such that you can gradually transitional between a multitude of colors over a period of time or as show different colors in response to changes in some other variable.

0 Comments

Customising Activity View Controller - Mail

22/6/2013

0 Comments

 
The previous post shows how to customize the Activity View Controller using UIActivityItemProvider, which enables you to customize the text that get shown in Twitter, Facebook, Weibo, Mail, etc. Indeed, you can customize more than just text.

One thing you may notice is that with Mail, any text object that you pass to the standard Mail activity just get shown in the body of the email. How do you set the subject? Add an attachment? Set the recipient? 
You can set all this using a custom UIActivity together with a UIActivityItemProvider object.

Step 1: Start with the Previous Example
This example builds upon the previous example about Customising Activity View Controller.

Step 2: Create another subclass of UIActivityItemProvider
As said in the previous post, the object of this class serves as a proxy for data object that is passed to the activity view controller through the activityItems array. In this example, we are creating a class called MailItemProvider, which will generate the components (i.e. email body, subject, etc) required to populate the email message. Because the UIActivityItemProvider object can only return a single object, all these components are put within a single object - a NSDictionary, which seems to be the most logical object to use for this purpose. (It appears, as of writing, that you cannot use NSArray as it is not one of the supported object type for this purpose.)

Insert the following codes in the viewController.m file (somewhere after the #import):
@interface MailItemProvider:UIActivityItemProvider
@property (nonatomic, strong) NSString *someText;
@end

@implementation MailItemProvider
@synthesize someText = _someText;
- (id)initWithPlaceholderItem:(id)placeholderItem
{
    return [super initWithPlaceholderItem:placeholderItem];
}

- (id)item
{
    return [NSDictionary dictionary];
}
-(id)activityViewController:(UIActivityViewController *)activityViewController itemForActivityType:(NSString *)activityType
{
    NSDictionary *exportDetailsDict = [NSDictionary dictionary];
    if ([activityType isEqualToString:kYourCustomMailType]) {
        //-- create the attachment data
        NSData *attachementData = [NSData data];
        //-- message for the email
        NSString *theMessage = [NSString stringWithFormat:@"Some message:\n%@",_someText];
        //-- subject for the email
        NSString *theSubject = @"Email Subject";
       //-- create the dictionary
        exportDetailsDict = [NSDictionary dictionaryWithObjectsAndKeys:attachementData,@"ATTACHMENT",
                                           theMessage,@"MESSAGE",
                                           theSubject,@"SUBJECT", nil];
    }
    return exportDetailsDict;
}

- (id)activityViewControllerPlaceholderItem:(UIActivityViewController *)activityViewController
{
    return [NSDictionary dictionary];
}
@end

In addition to the above, you also need to define a NSString constant. Insert the following after the last #import line:
         NSString *const kYourCustomMailType = @"YourCustomMailType";

The above codes follow the same logic as the previous post about using UIActivityItemProvider. Instead of returning a NSString object, the above return a NSDictionary.

This example only generates the body of the email message, the subject text and an attachment (which is just an empty pdf container here). You can of course populate the to, cc, and bcc recipient fields in your code as well.

Step 3: Create a custom UIActivity
Next, you need to roll your own UIActivity. We will create MailExportActivity which is a subclass of UIActivity. This class will handle your custom type (called 'YourCustomMailType' in this example) and present the standard mail interface using the MFMailComposerViewController. Unlike the standard Mail activity, our custom activity will allow you to pre-populate the various components of the email.

First, include the MessageUI framework, and #import <MessageUI/MessageUI.h>

Next, insert the following codes in the viewController.m file:

@interface MailExportActivity : UIActivity  <MFMailComposeViewControllerDelegate>
@property (nonatomic, strong) NSArray *items;
@end


@implementation MailExportActivity
@synthesize items = _items;

- (NSString *)activityType
{
    return kYourCustomMailType;
}

- (NSString *) activityTitle
{
    return @"Custom Mail";
}

- (UIImage *) activityImage
{

    //This creates an UIImage with the word 'mail' in the middle.
    //Alternatively, you can use [UIImage imageNamed: ] to create the UIImage object

    CGRect rect = CGRectMake(0.0f, 0.0f, 85.0f, 85.0f);
    UIGraphicsBeginImageContext(rect.size);


    rect = CGRectInset(rect, 15.0f, 15.0f);
    UIBezierPath *path = [UIBezierPath bezierPathWithRoundedRect:rect cornerRadius:10.0f];
    [path stroke];


    rect = CGRectInset(rect, 0.0f, 10.0f);
    [@"Mail" drawInRect:rect withFont:[UIFont fontWithName:@"Futura" size:13.0f] lineBreakMode:NSLineBreakByWordWrapping alignment:NSTextAlignmentCenter];

    UIImage *image = UIGraphicsGetImageFromCurrentImageContext();
    UIGraphicsEndImageContext();

    return image;
}

- (BOOL)canPerformWithActivityItems:(NSArray *)activityItems
{
    //Determine whether this service should be displayed by the UIActivityController
    //(This mostly depends if this service can do something with the objects/ data provided via the activityItems

    for (id item in activityItems){
        if ([item isKindOfClass:[NSDictionary class]]) {
            return YES;
        }
    }
    return NO;
}

- (void)prepareWithActivityItems:(NSArray *)activityItems
{
    //This gets call when the user select this custom service
    //Then, the controller will either call :
    //(a) the activityViewController, or
    //(b) performActivity.

    self.items = activityItems;
}

- (UIViewController *) activityViewController
{
    //-- codes to generate the export data
    NSString *theSubject = @"Default Subject";
    NSString *theMessage = @"Default Message";
    NSString *theFileName = @"default.pdf";
    NSData *theData;

    for (id eachItem in _items){
        if ([eachItem isKindOfClass:[NSDictionary class]]) {
            NSDictionary *exportDetailsDict = eachItem;
            theSubject = [exportDetailsDict objectForKey:@"SUBJECT"];
            theMessage = [exportDetailsDict objectForKey:@"MESSAGE"];
            theData = [exportDetailsDict objectForKey:@"ATTACHMENT"];
        }
    }

    MFMailComposeViewController *mailComposeVC = [[MFMailComposeViewController alloc] init];
    mailComposeVC.mailComposeDelegate = self;
    [mailComposeVC setSubject:theSubject];
    //[mailComposeVC setToRecipients:[[NSArray alloc] initWithObjects:@"info@example.com", nil]];

    [mailComposeVC setMessageBody:theMessage isHTML:NO];

    [mailComposeVC addAttachmentData:theData
                     mimeType:@"application/pdf"
                     fileName:theFileName];

    return mailComposeVC;
}

#pragma martk - MFMailComposeViewControllerDelegate
- (void)mailComposeController:(MFMailComposeViewController *)controller didFinishWithResult:(MFMailComposeResult)result error:(NSError *)error
{
    if (result == MFMailComposeResultSent) {
        //This notifies the system that your activity object has completed its work.
        //This will dismiss the view controller provided via activityViewController method and the sharing interface provided by the UIActivityViewController
        [self activityDidFinish:YES];
    } else
    {
        [self activityDidFinish:NO];
    }
}
@end


Comments have been inserted above, so it is self-explaining. It is simply overriding and implementing the methods in the UIActivity class. If anything is not clear, it is always good to consult the Apple Documentation.

When your custom activity icon is clicked, the activityItem created under step 2 above is passed to your custom class. The method (void)prepareWithActivityItems:(NSArray *)activityItems gets called. In this example, the activityItem object (which contains the NSDictionary) is assigned to the items NSArray.

When you roll your own UIActivity, you can present a UIViewController in which the user can provide additional input before perform whatever service you want to do on the data. The UIViewController that gets presented is the one returned under the (UIViewController *) activityViewController method. Inside this method, we have instantiated the usual MFMailComposeViewController and populated its properties with the values and data that we have passed in through the NSDictionary object inside the items NSArray.

Our custom MailExportActivity class also confirms to the MFMailComposeViewControllerDelegate protocol. (This what the bit of the code "UIActivity<MFMailComposeViewControllerDelegate>" means.) This is important as this provides the means to inform the Activity View Controller when our custom service has performed its task (i.e. sending the email) or when user otherwise cancel the task (such as clicking the 'cancel' button in the MFMailComposeView). When this happens, the delegate method (void)mailComposeController:(MFMailComposeViewController *)controller didFinishWithResult:(MFMailComposeResult)result error:(NSError *)error gets called. Inside this method we invoke the activityDidFinish:(BOOL)completed method of UIActivity class. This dismisses the view controller presented by the UIActivityViewController as well as the MFMailComposeView.

Step 4: Instantiate Your custom UIActivityItemProvider and the Your Custom UIActivity
Delete the activityItems NSArray and the instantiation of the UIActivityViewController under the previous post. Then insert the following: 

    MailItemProvider *mailItem = [[MailItemProvider alloc] initWithPlaceholderItem:[NSDictionary dictionary]];
    mailItem.someText = _aTextView.text;

    //--- initialise the custome activity
    UIActivity *customMailActivity = [[MailExportActivity alloc] init];
    NSArray *activityItems = [NSArray arrayWithObjects:textItem, mailItem, nil];

    //-- initialising the activity view controller (with custom activity)
    UIActivityViewController *avc = [[UIActivityViewController alloc]
                                     initWithActivityItems:activityItems
                                     applicationActivities:@[customMailActivity]];


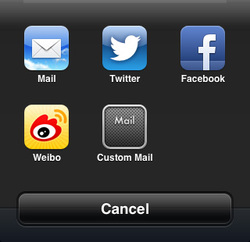
Picture
The UIActivityView screen should now contain a custom icon like that shown on the left hand side image. When you clicked it the email view will appear with a subject text, a body text and an attachment. (As said above, the attachment in this example is just a dummy attachment, and you can also populate other email fields by extending the approach described here. Essentially, you just need to add a few more key value pairs to the NSDictionary object.)

In your code it would be a good idea to determine if mail capabilities are enabled on the user's device first before initialising the above activity view controller with your custom activity (which would present a mail controller). You can do this by using:
        [MFMailComposeViewController canSendMail]
If this returns true, you can initialise the above activity view controller; if false, you can initialise the plain vanilla activity view controller without the custom activity.
0 Comments

Customising the Activity View Controller

27/5/2013

1 Comment

 
The UIActivityViewController class provides a quick and simple way to add common actions to an app, such as post to Facebook, post to Twitter, send a mail or message, copy to pasteboard, etc. It is nice and simple when you are dealing with invariant data, such as when you want to send the same message across Facebook, Twitter, Weibo and mail. You can do that using the approach outlined in a previous post.

However, there are many occasions where you probably want to do things differently depending on the service. For example, you may want to send a particular message when posting to Facebook and a different one when posting to Twitter. The character limit on Twitter may mean, for example, that you want to truncate the message that you post to Twitter. You may want to have a different image resolution for different things.

How do you do this? This post describes one approach to achieve this - using the UIActivityItemProvider class.
This class uses the call back defined in the UIActivityItemSource protocol to enable you to vary the data depending on activity type.

Step 1: Start with the Previous Example
This example builds upon the example in the previous post. 

Step 2: Creates a  Subclass of the UIActivityItemProvider Class
Add the following code to the ViewController.m file:

@interface TextItemProvider:UIActivityItemProvider
@property (nonatomic, strong) NSString *someText;
@end


@implementation TextItemProvider
@synthesize someText = _someText;
- (id)initWithPlaceholderItem:(id)placeholderItem
{
    //Initializes and returns a provider object with the specified placeholder data
    return [super initWithPlaceholderItem:placeholderItem];
}

- (id)item
{
    //Generates and returns the actual data object
    return @"";
}

// The following are two methods in the UIActivityItemSource Protocol
// (UIActivityItemProvider conforms to this protocol) - both methods required

//- Returns the data object to be acted upon. (required)
- (id)activityViewController:(UIActivityViewController *)activityViewController itemForActivityType:(NSString *)activityType
{
    if ([activityType isEqualToString:UIActivityTypePostToFacebook]) {
        NSString *theText = @"Some text for Facebook";
        return theText;
    }

    if ([activityType isEqualToString:UIActivityTypePostToTwitter]) {
        NSString *theText = @"Some text for Twitter";
        return theText;
    }

    if ([activityType isEqualToString:UIActivityTypePostToWeibo]) {
        NSString *theText = @"Some text for Weibo";
        return theText;
    }

    if ([activityType isEqualToString:UIActivityTypeMail]) {
        NSString *theText = _someText;
        return theText;
    }

    if ([activityType isEqualToString:kYourCustomMailType]) {
        NSString *theText = @"Some text for your Custom Type";
        return theText;
        }

    return @"Some default text";
}

//- Returns the placeholder object for the data. (required)
//- The class of this object must match the class of the object you return from the above method
- (id)activityViewControllerPlaceholderItem:(UIActivityViewController *)activityViewController
{
    return @"";
}
@end


The above creates a class called TextItemProvider, which is a subclass of the UIActivityItemProvider. For convenience here, the code is put in the ViewController.m file. You may want to put this in a separate file and #import it.

The comments inserted into the code above should provide a good idea of how it works. 

Essentially, object of this class serves as a proxy for the eventual data/ object that get passed to the Activity View Controller. According to the documentation it is a type of operation (NSOperation) that enables you to delay passing data. As it runs asynchronously (i.e. not in the main thread) it can be used to process large data (e.g. video files) without disrupting the user experience.  

The most important method to achieve our goal here is the method:
(id)activityViewController:(UIActivityViewController *)activityViewController itemForActivityType:(NSString *)activityType

This method is defined in the UIActivityItemSource protocol (the UIActivityItemProvider class conforms to this protocol). When the user clicks the service in the activity view controller screen, this method is called and it returns the data object, which is a NSString object in this case (but it can be other objects). In this example, the codes simply generate a different text depending on the activityType.  

Step 3: Create the UIActivityItemProvider object and add it to the Activity View Controller
Delete the line in the previous example that says:
        NSArray *activityItems = [NSArray arrayWithObjects:textObject, url, image, nil];
(You can also delete the NSString, NSURL, UIImage lines above it too if you like, but leaving it should not harm this example.)

And replace it with the following:
        TextItemProvider *textItem = [[TextItemProvider alloc] initWithPlaceholderItem:@"Default text"];
        textItem.someText = _aTextView.text;
        NSArray *activityItems = [NSArray arrayWithObjects:textItem, nil];


This creates a TextItemProvider object called textItem. The next line simply passes the text in aTextView to the textItem object so that it can use the text (if required) when it generates the NSString data. You can pass other data or variables to it if required by your app.

When the activity view controller is instantiated (see previous code), the textItem object will be one of the Activity Item. 

The result is that when you clicked the Twitter icon in the Activity View screen, the Twitter screen will contain the text "Some text for Twitter". If you click the Facebook icon, it will be "Some text for Facebook", and so on.

1 Comment

Using AFNetworking

28/1/2013

2 Comments

 
In the past I have been using ASIHTTPRequest networking library for my apps. It was simple to use which is a good thing for someone who was new to iOS programming. I only needed it for simple GET/POST requests, returning the occasional JSON. A few simple example codes that I found at that time also make picking up ASIHTTPRequest nice and easy. Unfortunately, I soon I realized that the developer is no longer updating the library. I resisted changing to another networking library for a long while, because I don't feel like learning another library and because there don't seen to be much simple example codes around. Codes that were available (or at least those that I can find) are either too brief or dealt with things I don't need, and the codes also look rather complex when compared to those in the ASIHTTPRequest library. In short, it seems complicated and takes a lot of time to learn - and I don't have the time.

Recently, I have found time to look into AFNetworking a bit more and it is also time to change to another networking library as it would be most unwise to keep using a library that has ceased to be developed since mid 2011. ASIHTTPRequest still seems to work fine for the occasional, light networking uses that I need it for.

AFNetworking turns out to be much simpler than I had initially expected. It is also much more powerful, flexible and maintainable going forward. The main reason for this is that it is built on top of NSURLConnection and NSOperation, and it uses blocks which is also the reason that it looks much more complex when I first looked at it (at which time my understanding of blocks is next to nil and hardly know anything about NSURLConnection or NSOperation).

AFNetworking has good documentation, but there there seems very little example around. And I prefer to learn by going through an example, especially short codes that illustrate the basic principle or approach. In particular, I was puzzled by how to make a simple HTTP GET or POST request using AFNetworking. Here are some simple codes snippet and notes.

Set Up your Project to Use AFNetworking

The Getting Started guide on AFNetworking github page is most useful for this purpose.

HTTP GET Request

You need to use the AFHTTPClient and AFHTTPRequestOperation, so import them as follows :

#import "AFHTTPClient.h"
#import "AFHTTPRequestOperation.h"


The codes:
AFHTTPClient *httpClient = [[AFHTTPClient alloc] initWithBaseURL:[NSURL URLWithString:@"http://yourServerAddress.com/"]];
    [httpClient setParameterEncoding:AFFormURLParameterEncoding];
    NSMutableURLRequest *request = [httpClient requestWithMethod:@"GET"
                                                            path:@"
http://yourServerAddress.com/example?name=foo"
                                                      parameters:nil];

[httpClient registerHTTPOperationClass:[AFHTTPRequestOperation class]];
    AFHTTPRequestOperation *operation = [httpClient HTTPRequestOperationWithRequest:request
                                        success:^(AFHTTPRequestOperation *operation, id responseObject) {
                                           
//-- This block gets invoked when the operation is successful
                                            //-- Here it simply print out the responseObject as text in the log
                                            NSLog(@"Response: %@", [[NSString alloc] initWithData:responseObject encoding:NSUTF8StringEncoding]);
                                        } failure:^(AFHTTPRequestOperation *operation, NSError *error) {
                                            //-- This block gets invoked when the operation fails
                                            NSLog(@"Error: %@", error.localizedDescription);
                                        }];

//-- The following codes allow you to track the download progress (if required)
[operation setDownloadProgressBlock:^(NSUInteger bytesRead, long long totalBytesRead, long long totalBytesExpectedToRead) {
        //-- This block gets invoked periodically as the download progress
        NSLog(@"bytesRead: %i; totalBytesRead: %lld; totalexpected: %lld", bytesRead, totalBytesRead, totalBytesExpectedToRead);
    }];

//-- end of the download progress tracking code

[httpClient enqueueHTTPRequestOperation:operation];


Alternative codes:
(using the getPath: method in AFHTTPClient)
AFHTTPClient *httpClient = [[AFHTTPClient alloc] initWithBaseURL:[NSURL URLWithString:@"http://yourServerAddress.com/"]];
NSString *pathStr = @"/example?name=foo";
[httpClient getPath:pathStr parameters:paramaters success:^(AFHTTPRequestOperation *operation, id responseObject) {
        NSString *responseStr = [[NSString alloc] initWithData:responseObject encoding:NSUTF8StringEncoding];
        NSLog(@"Request Successful, response '%@'", responseStr);
    } failure:^(AFHTTPRequestOperation *operation, NSError *error) {
        NSLog(@"Error: %@", error.localizedDescription);
    }];

The alternative is shorter, but the first version is more customisable. In particular, it allows you to get a reference to the relevant AFHTTPRequestOperation.

HTTP POST Request

Likewise, you need to use the AFHTTPClient and AFHTTPRequestOperation, so import them as noted above.

The codes:
AFHTTPClient *httpClient = [[AFHTTPClient alloc] initWithBaseURL:[NSURL URLWithString:@"http://yourServerAddress.com/"]];
//-- the content of the POST request is passed in as an NSDictionary
//-- in this example, there are two keys with an object each
NSDictionary *parameters = [NSDictionary dictionaryWithObjectsAndKeys:
                                  
object1, @"KEY_NAME_1",
                                  
object2, @"KEY_NAME_2",
                                   nil];

[httpClient postPath:@"/postExample/" parameters:parameters success:^(AFHTTPRequestOperation *operation, id responseObject) {
        NSString *responseStr = [[NSString alloc] initWithData:responseObject encoding:NSUTF8StringEncoding];
        NSLog(@"Request Successful, response '%@'", responseStr);
    } failure:^(AFHTTPRequestOperation *operation, NSError *error) {
        NSLog(@"Error: %@", error.localizedDescription);
    }];

Subclassing AFHTTPClient
The above codes use an instance of the AFHTTPClient class. The documentation for AFNetworking, however, suggests that we should sub-class it for each website or web application that the app communicates with. 

2 Comments

Apple In-App Purchase: Creating App Store Hosted Content

2/1/2013

2 Comments

 
Following the introduction of iOS 6 it is possible to host the content of your in-app purchase on Apple's server, rather than having to host the contents on your own server under previous iOS versions. This makes it simpler (and perhaps less expensive) to implement in-app purchase for your app as you no longer need to develop and maintain your own server to host the purchased contents.
The steps in filling out the online forms in iTunes Connect when setting up each product that you want to sell via in-app purchase appears simple enough until you come to the point where you need to upload the content to the Apple server. How do you upload the content? What format should the content be in? There is a scarcity of documentation or guides around regarding this. Some guides simply said that your need to put all your contents in a 'package' and that is what you upload to Apple. This raises another question: what is this 'package' thing? How do you create it?
After putting together information from many sources, here are the steps to create the Apple App Store hosted content and also how to upload the same to Apple.
What is the Package?
The package is simply a structured folder, which contains a ContentInfo.plist in the root level and a sub-folder called 'Contents'. The ContentInfo.plist contains two keys:
  • ContentVersion - This is the version number of the content.
  • IAPProductionIdentifier - This is the product identifier of the product with which the content is associated. i.e. the identifier you defined in iTunes Connect.
The Contents folder contains the actual files associated with the in-app purchase. e.g. in an app that sell music score, it would be the actual music score file or files. Note that the content must not contain executable codes, otherwise the package would not be valid.
How to create the Package
Even though the package is structured folder, you cannot just create a folder on the Finder with the above contents. The best way to create the package that meets Apple's requiremetns it seems at the moment is to use Xcode. (The following steps are based on Xcode 4.6.)

Creating the Package
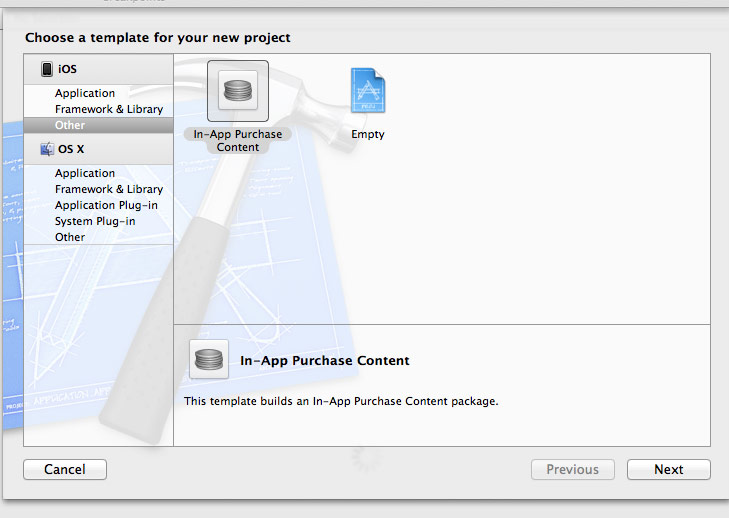
Step 1: Create a New Project in Xcode
File > New > Project
Select "Other" under iOS heading on the left hand panel of the template screen.
Select 'In-App Purchase Content" on the right hand side.
Then click "Next".
Picture
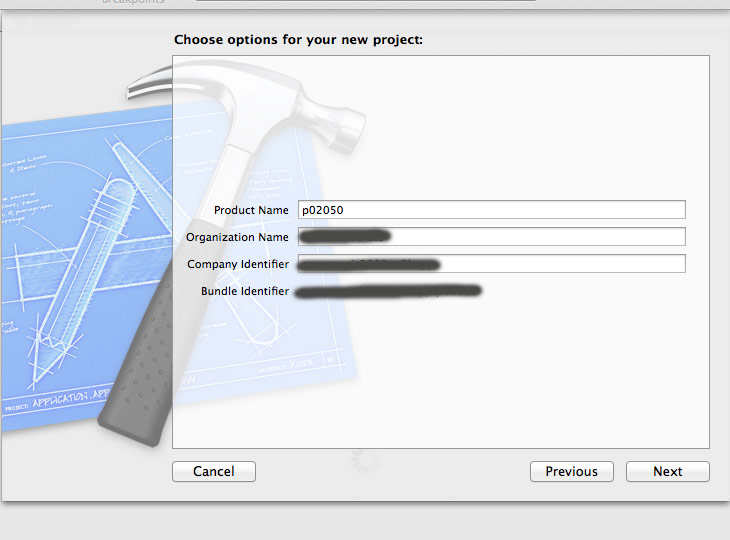
Step 2: Enter the info for this project
For Product Name, enter the product identifier as defined by you in iTunes Connect. The two must be the same. Fill in the Organization Name and Company identifier as you normally would. In this example, the identifier is "p02050".
Then click "Next".
Picture
Step 3: Update the ContentInfo.plist
Unfold the Supporting Files section of the project navigator panel and select the ContentInfo.plist file. Update the two keys in this file.
ContentVersion - the default version is 1.0, update this as required
IAPProductIdentifier - change this so that it matches the Product Identifier your defined in iTunes Connect.
Picture
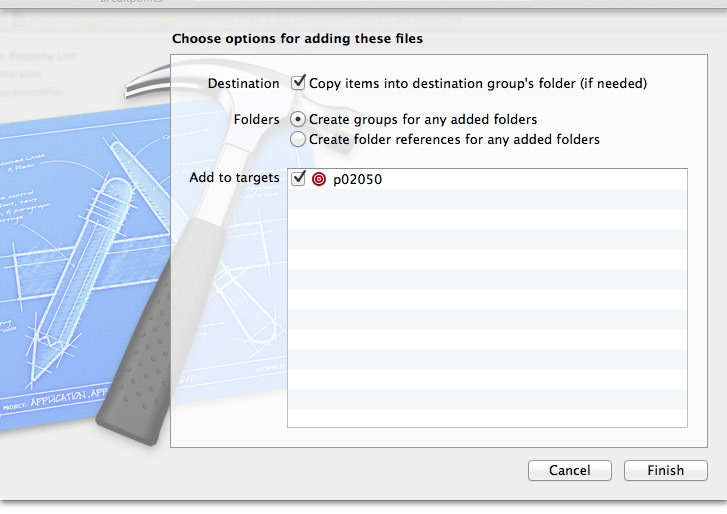
Step 4: Add in the Actual Contents
Locate all the relevant content files on your computer in the Finder.
Drag and drop the files onto the Supporting Files section of the project navigator panel.
Complete the panel as shown below and then clicked "Finish".
Picture
Step 5: Archive the Project
Select Project > Archive from the menu.
Picture
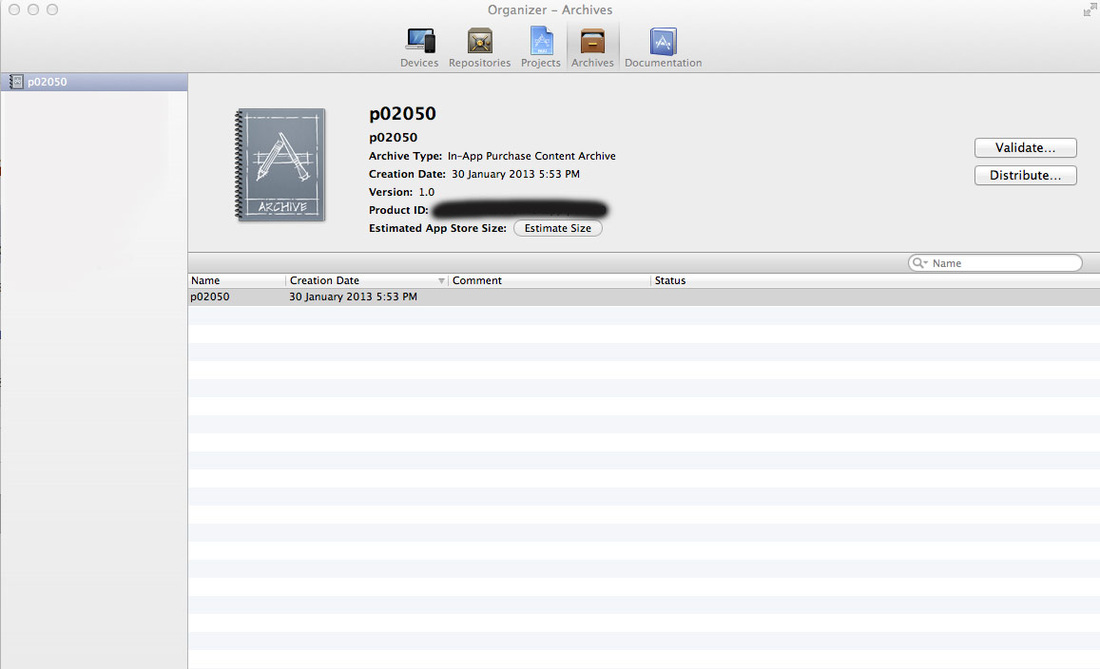
Step 6: Validate the Package
Click the "Validate" button.
Fill in the panel that appear as you normally would when validating and submitting an app. Make sure the correct app content is selected in the In-App Purchase Content drop down menu.
Step 7: Export the Package
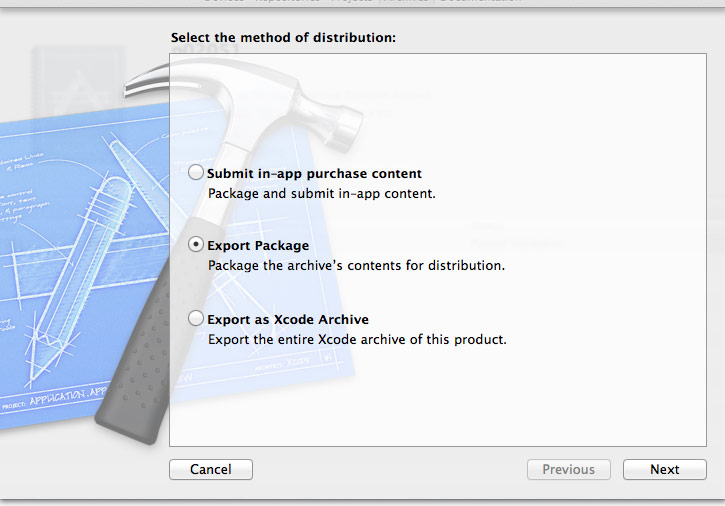
Click the "Distribute" button.
Select the "Export Package" radio button and click "Next".
Enter a name and Select a location on your computer to save the resulting package.
Then clicked "Save".
This step is option as you can upload the content at this point using Xcode. See below.
Picture
How to Upload the Package?
You have two options:
a. use Xcode; or
b. use Application Loader - This is a free tool provided by Apple. After you have logged in to iTunes Connect, clicked the "Managed Your Applications" link. The link to this Applciation Loader is located towards the bottom of the screen.
Using Xcode to Upload
This is same as what you normally do when submitting an app for review. That is, instead of choosing the "Export Package" option in the above panel, choose "Submit in-app purchase content". After clicking Next, put in your developer program credentials and select the correct application and product identifier, then click "Submit"


2 Comments

Invoking the Map App to provide routing direction

18/10/2012

0 Comments

 
This post briefly describes how to invoke the Map app from your own app to provide routing direction from your current location to a particular destination coordinate.
(Step 1 and 2 below can be skipped if you only want to use iOS 6.)
Step 1: Include the CoreLocation framework
You need to first include the CoreLocation Framework in your project. Then you need import that framework in the relevant project class file:
#import <CoreLocation/CoreLocation.h>
Step 2: Add codes to obtain the current location
First, you need an object to hold the current location. In the .h file:
@property (nonatomic, strong) CLLocation *currentLocation;
And in the corresponding .m file:
@synthesize currentLocation = _currentLocation;
Next you need to make the class adopt to the CLLocationManagerDelegate protocol. So add <CLLocationManagerDelegate> to the @interface.

In viewDidLoad, insert:
if ([CLLocationManager locationServicesEnabled]) {
        //- initialise location manager
        CLLocationManager *locManager= [[CLLocationManager alloc] init];
        locManager.delegate = self;
        locManager.desiredAccuracy = kCLLocationAccuracyBest;  // modify to set desire accuracy
        locManager.distanceFilter = kCLDistanceFilterNone;   // modify if required     
        [locManager setPurpose:@"This app will use your location to determine your current position."];
        [locManager startUpdatingLocation];
    } else {
        //-- show an alert or whatever...;
    }

This first check if location service is available, then if it is, an instance of the location manager is created and start the location update.
Next, implement the following method in the CLLocationManagerDelegate protocol:
- (void) locationManager:(CLLocationManager *)manager didUpdateToLocation:(CLLocation *)newLocation fromLocation:(CLLocation *)oldLocation
{
    //- only use relatively recent event
    NSDate* eventDate = newLocation.timestamp;
    NSTimeInterval howRecent = [eventDate timeIntervalSinceNow];
    if (abs(howRecent) < 15.0) {
              newLocation.coordinate.latitude,
              newLocation.coordinate.longitude);
        self.currentLocation = newLocation;
    }
}

This method will be called once a location fix occurs. The coordinate is passed to the currentLocation object that you have created. The above code also provide a check to make sure that the location is not too old. If you don't need to do that, you can simply replace the above with:
self.currentLocation = newLocation;

Step 3: Include the CoreLocation framework
You need to first include the MapKit Framework in your project. Then you need import that framework in the relevant project class file:
#import <MapKit/MapKit.h>
Step 4: Codes to show invoke the Map App and Show the Route
Add the following method in your .m file:
- (void)showRouteInMapApp
{
    Class itemClass = [MKMapItem class];
    if (itemClass && [itemClass respondsToSelector:@selector(openMapsWithItems:launchOptions:)]) {
        //- iOS 6
        CLLocationCoordinate2D destCoordinate = CLLocationCoordinate2DMake([_latitude doubleValue], [_longtitude doubleValue]);
        MKPlacemark* place = [[MKPlacemark alloc] initWithCoordinate: destCoordinate addressDictionary: nil];
        MKMapItem* destination = [[MKMapItem alloc] initWithPlacemark: place];
        destination.name = @"NAME OF LOCATION...";
        NSArray* items = [[NSArray alloc] initWithObjects: destination, nil];
        NSDictionary* options = [[NSDictionary alloc] initWithObjectsAndKeys:
                                 MKLaunchOptionsDirectionsModeDriving,
                                 MKLaunchOptionsDirectionsModeKey, nil];
        [MKMapItem openMapsWithItems: items launchOptions: options];
    } else {
        //- use pre iOS 6
        //-- this opens in the map app
        NSString* url = [NSString stringWithFormat: @"maps://saddr=%f,%f&daddr=%f,%f",
                         _currentLocation.coordinate.latitude, _currentLocation.coordinate.longitude,[_latitude doubleValue],[_longtitude doubleValue]];
        [[UIApplication sharedApplication] openURL: [NSURL URLWithString: url]]; 
    }
}

The above first check to see if you are using iOS 6. If so, it uses the new MKMapItem approach, otherwise it uses an old approach to invoke the map app together with the current location coordinate determined via the codes in Step 1 and 2.
Instead of opening the map app, you can open Google map in Safari by replacing the above url with the following:
NSString* url = [NSString stringWithFormat: @"http://maps.google.com/maps?saddr=%f,%f&daddr=%f,%f",
         _currentLocation.coordinate.latitude, _currentLocation.coordinate.longitude,[_latitude doubleValue],[_longtitude doubleValue]];

0 Comments

IOS 6 State Preservation and Restoration

28/9/2012

0 Comments

 
iOS 6 provides a build in mechanism to preserve and subsequently restore the state of your app. This post is not about how to implement that. It is a brief note about how to test this behavior.
We need to simulate the application being terminated by the OS whilst it is in the background. To do so, perform the following steps exactly:
1. Run the app in the Simulator by pressing "Run" in xcode
2. Put the app into the background by pressing the Home button
3. Stop the app by pressing "Stop" in xcode
The above should trigger the operation of the preservation routines in your app assuming you have set it up properly of course.
To test the restoration process, simply Run the app again. You can do this in xcode or just click the app icon in the simulator. When the app is running again, it should, assuming things are set up properly, trigger the relevant restoration routines in the app and restore the app to its previous state.
Note: an app's preserved state is deleted if the user force quite the app, i.e. don't use the multi-tasking bar to kill the app to test preservation and restoration.

0 Comments
<<Previous

    Archives

    August 2013
    July 2013
    June 2013
    May 2013
    January 2013
    October 2012
    September 2012
    March 2012
    February 2012

    Categories

    All
    Apple Policy
    In App Purchase
    Ios Programming
    Our Apps

    RSS Feed

    Disclaimers

    Here are some resources that I find useful in writing iOS apps. These are not necessarily unique as they are based on various sources online.
    This is mainly to provide a source of reference to myself and my associates but if it can be of use to someone else, that is good.
    Note that information is provided here as is. Use at your own risk. There is no guarantee that it is accurate. We will update the information as time and resources permit.

    Powered by Create your own unique website with customizable templates.