
Following the introduction of iOS 6 it is possible to host the content of your in-app purchase on Apple's server, rather than having to host the contents on your own server under previous iOS versions. This makes it simpler (and perhaps less expensive) to implement in-app purchase for your app as you no longer need to develop and maintain your own server to host the purchased contents.
The steps in filling out the online forms in iTunes Connect when setting up each product that you want to sell via in-app purchase appears simple enough until you come to the point where you need to upload the content to the Apple server. How do you upload the content? What format should the content be in? There is a scarcity of documentation or guides around regarding this. Some guides simply said that your need to put all your contents in a 'package' and that is what you upload to Apple. This raises another question: what is this 'package' thing? How do you create it?
After putting together information from many sources, here are the steps to create the Apple App Store hosted content and also how to upload the same to Apple.
What is the Package?
The package is simply a structured folder, which contains a ContentInfo.plist in the root level and a sub-folder called 'Contents'. The ContentInfo.plist contains two keys:
How to create the Package
Even though the package is structured folder, you cannot just create a folder on the Finder with the above contents. The best way to create the package that meets Apple's requiremetns it seems at the moment is to use Xcode. (The following steps are based on Xcode 4.6.)
Creating the Package
Step 1: Create a New Project in Xcode
File > New > Project
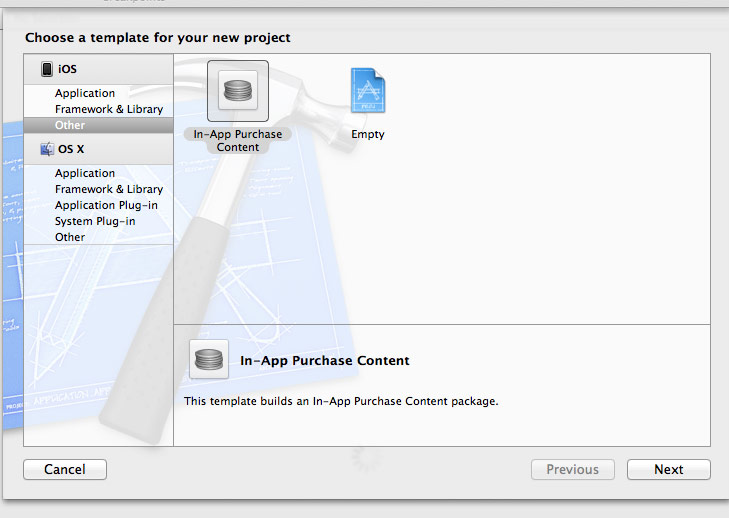
Select "Other" under iOS heading on the left hand panel of the template screen.
Select 'In-App Purchase Content" on the right hand side.
Then click "Next".
The steps in filling out the online forms in iTunes Connect when setting up each product that you want to sell via in-app purchase appears simple enough until you come to the point where you need to upload the content to the Apple server. How do you upload the content? What format should the content be in? There is a scarcity of documentation or guides around regarding this. Some guides simply said that your need to put all your contents in a 'package' and that is what you upload to Apple. This raises another question: what is this 'package' thing? How do you create it?
After putting together information from many sources, here are the steps to create the Apple App Store hosted content and also how to upload the same to Apple.
What is the Package?
The package is simply a structured folder, which contains a ContentInfo.plist in the root level and a sub-folder called 'Contents'. The ContentInfo.plist contains two keys:
- ContentVersion - This is the version number of the content.
- IAPProductionIdentifier - This is the product identifier of the product with which the content is associated. i.e. the identifier you defined in iTunes Connect.
How to create the Package
Even though the package is structured folder, you cannot just create a folder on the Finder with the above contents. The best way to create the package that meets Apple's requiremetns it seems at the moment is to use Xcode. (The following steps are based on Xcode 4.6.)
Creating the Package
Step 1: Create a New Project in Xcode
File > New > Project
Select "Other" under iOS heading on the left hand panel of the template screen.
Select 'In-App Purchase Content" on the right hand side.
Then click "Next".
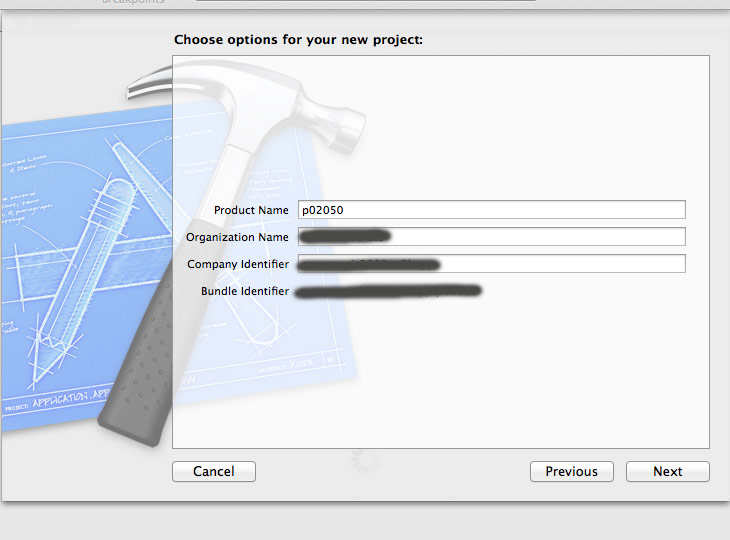
Step 2: Enter the info for this project
For Product Name, enter the product identifier as defined by you in iTunes Connect. The two must be the same. Fill in the Organization Name and Company identifier as you normally would. In this example, the identifier is "p02050".
Then click "Next".
For Product Name, enter the product identifier as defined by you in iTunes Connect. The two must be the same. Fill in the Organization Name and Company identifier as you normally would. In this example, the identifier is "p02050".
Then click "Next".
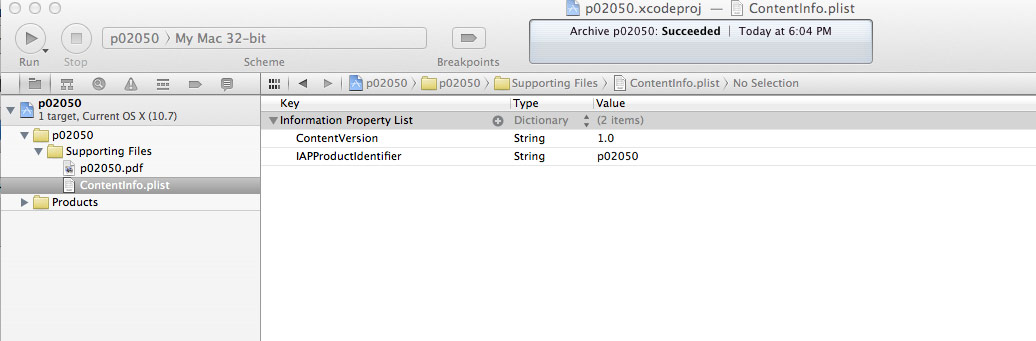
Step 3: Update the ContentInfo.plist
Unfold the Supporting Files section of the project navigator panel and select the ContentInfo.plist file. Update the two keys in this file.
ContentVersion - the default version is 1.0, update this as required
IAPProductIdentifier - change this so that it matches the Product Identifier your defined in iTunes Connect.
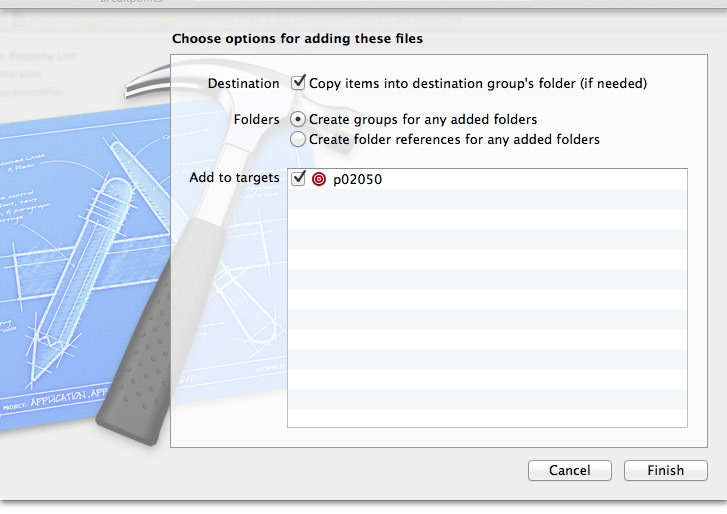
Step 4: Add in the Actual Contents
Locate all the relevant content files on your computer in the Finder.
Drag and drop the files onto the Supporting Files section of the project navigator panel.
Complete the panel as shown below and then clicked "Finish".
Locate all the relevant content files on your computer in the Finder.
Drag and drop the files onto the Supporting Files section of the project navigator panel.
Complete the panel as shown below and then clicked "Finish".
Step 5: Archive the Project
Select Project > Archive from the menu.
Select Project > Archive from the menu.
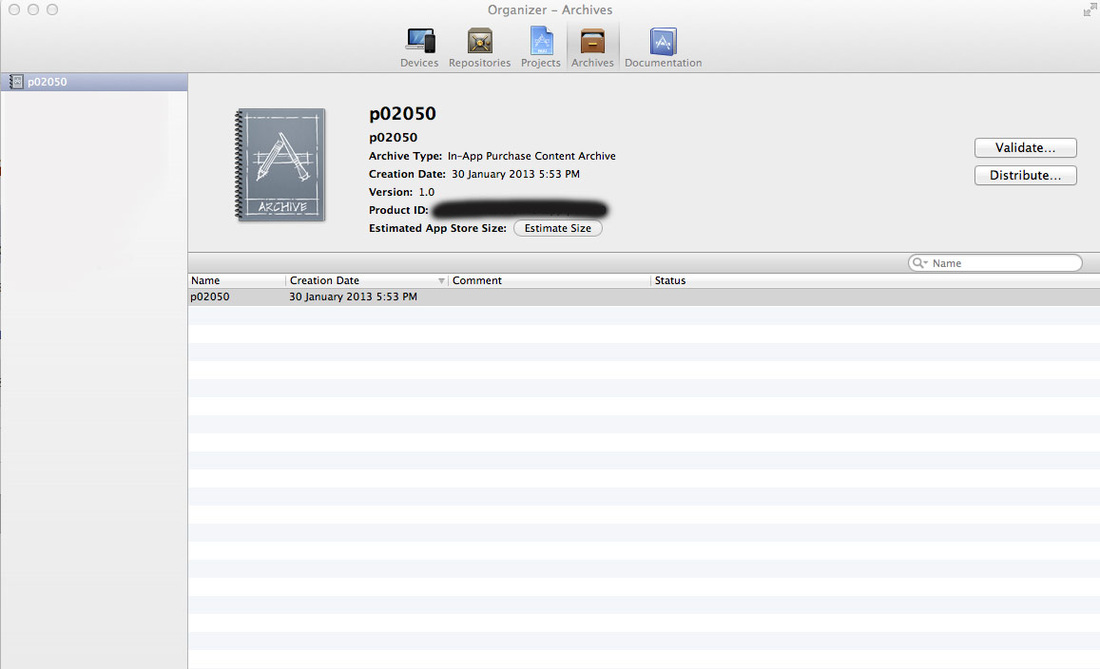
Step 6: Validate the Package
Click the "Validate" button.
Fill in the panel that appear as you normally would when validating and submitting an app. Make sure the correct app content is selected in the In-App Purchase Content drop down menu.
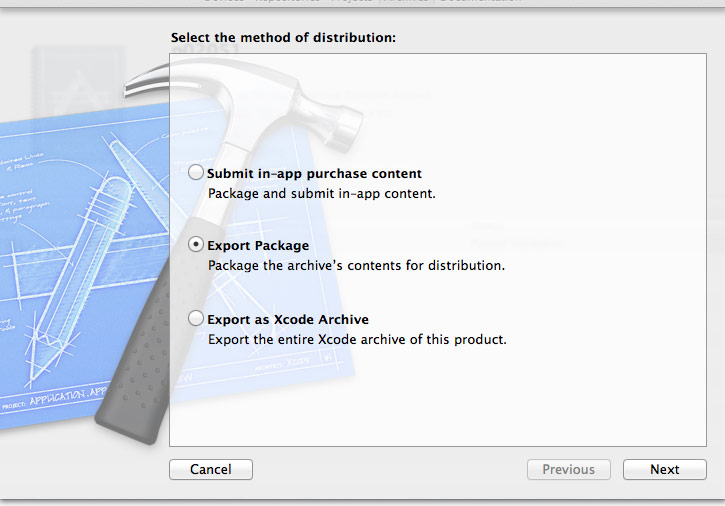
Step 7: Export the Package
Click the "Distribute" button.
Select the "Export Package" radio button and click "Next".
Enter a name and Select a location on your computer to save the resulting package.
Then clicked "Save".
This step is option as you can upload the content at this point using Xcode. See below.
Click the "Validate" button.
Fill in the panel that appear as you normally would when validating and submitting an app. Make sure the correct app content is selected in the In-App Purchase Content drop down menu.
Step 7: Export the Package
Click the "Distribute" button.
Select the "Export Package" radio button and click "Next".
Enter a name and Select a location on your computer to save the resulting package.
Then clicked "Save".
This step is option as you can upload the content at this point using Xcode. See below.
How to Upload the Package?
You have two options:
a. use Xcode; or
b. use Application Loader - This is a free tool provided by Apple. After you have logged in to iTunes Connect, clicked the "Managed Your Applications" link. The link to this Applciation Loader is located towards the bottom of the screen.
Using Xcode to Upload
This is same as what you normally do when submitting an app for review. That is, instead of choosing the "Export Package" option in the above panel, choose "Submit in-app purchase content". After clicking Next, put in your developer program credentials and select the correct application and product identifier, then click "Submit"
 RSS Feed
