Segues are used when you want to:
1. Go to another view controller - it does this by instantiating a view controller you set up and link to in the storyboard. The new view controller can be presented in different ways: modal, push (when embedded within a UINavigationController), popover, or embedded (such as in a container view).
2. Go back to a view controller that directly or indirectly presents the current view controller. This is the unwind segues.
3. Pass values or objects between view controllers as you are going to a view controller or unwinding to a previous view controller. Using the segues to pass values or objects between view controllers is very convenient, especially passing values or objects back to a prior view controllers. Without using segues, passing values or objects back to a prior view controller would require the use of protocol and delegates or some notification services. Segues often provide a more elegant and simpler (i.e. less code) way to achieve this.
Setting up the actual storyboard in Xcode is easy enough, but getting your code to work with it or talk to it is something else; it is not hard, you just need to know how. There are many very useful tutorials online about various aspect of it. The aim here is not to recreate those tutorials. This is a brief summary of the various things that are commonly performed and codes snippets that are often used.
Going to Another View Controller
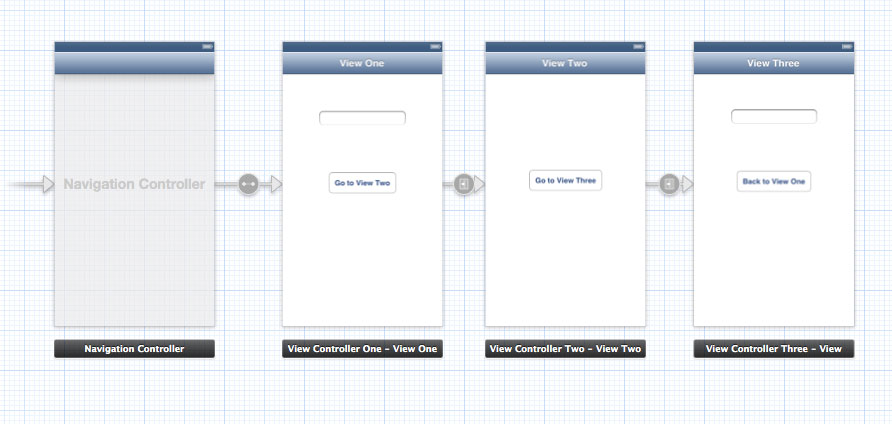
- There are three view controllers - ViewControllerOne, ViewControllerTwo and ViewControllerThree.
- These are all embeded within an UINavigationController.
- Clicking a button on ViewControllerOne will go to ViewControllerTwo via a push segue. Likewise, clicking a button in ViewControllerTwo will go to ViewControllerThree via a push segue.
Creating the segues: control drag from the relevant button to the view controller you want to show.
Code in the source view controller: (i.e. the controller you are originating from)
- (void)prepareForSegue:(UIStoryboardSegue *)segue sender:(id)sender
{
if ([segue.identifier isEqualToString:@"ViewControllerTwoSegue"]) {
ViewControllerTwo *vc2 = (ViewControllerTwo *)segue.destinationViewController;
vc2.name = self.textField.text;
}
}
where:
- 'ViewControllerTwoSegue' is the name of the segue set in storyboard
- 'ViewControllerTwo' is the class of the destination view controller (i.e. the view controller you are going to)
Passing values or objects: set the relevant property in the destination view controller inside the prepareForSegue method
In this example, ViewControllerTwo has a public property called 'name' (an NSString in this case). Here it is set to the value of a text field called 'textField' in ViewControllerOne.
Note: when the prepareForSegue method is called, the views in the destination view controller may not have been fully instantiated yet. This means it is often not a good idea to directly set the values of views (such as a text filed or label) in the destination view controller inside the prepareForSegue. e.g. if View Controller Two has a text field called 'textField', this may not work: vc2.textFeild.text = self.textField.text, or may work unreliably. It is often better to set the value of a property in the destination view controller and then set the text filed or label inside viewDidLoad of View Controller Two.
Going to Another View Controller Conditionally
Stopping the segue: return NO for shouldPerformSegueWithIdentifier:
The code:
- (BOOL)shouldPerformSegueWithIdentifier:(NSString *)identifier sender:(id)sender
{
if ([identifier isEqualToString:@"ViewControllerTwoSegue"]) {
return NO;
}
return YES;
}
where:
- 'ViewControllerTwoSegue' is the name of the segue set in storyboard
This method is invoked automatically by iOS before it calls prepareForSegue. This allows you to put conditional codes in it, to determine whether to actually perform the segue. The above code will prevent the user from going to ViewControllerTwo ever. This is probably not what you want to do all the time. In real code, you need to change 'return No' to something else that return NO or return YES based on some conditions that suit your app.
Passing Values or Objects
The above code only works in situation where the view you are going to is a UIViewController. The above won't work if you are going to a UINavigationController. Consider, for example, you start from a ViewController and the segue is connected to another view controller (say ViewControllerOne) that is itself embedded within a UINavigationController. The code above won't work because the object return by the destinationViewController property of the segue is not a UIViewController; it is in fact a UINavigationViewController. For this type of setup, use this code inside prepareForSegue:
if ([segue.identifier isEqualToString:@"ViewControllerOneSegue"]) {
if ([segue.destinationViewController isKindOfClass:[UINavigationController class]]) {
UINavigationController *navController = segue.destinationViewController;
ViewControllerOne *vc1 = [navController.viewControllers objectAtIndex:0];
vc1.name = self.textField.text;
}
}
where:
- 'ViewControllerOneSegue' is the name of the segue set in storyboard
The above code snippet also did a bit of introspection to confirm that the destination view controller is in fact a UINavigationController, but this is optional and not required if you know that the segue will always go to a UINavigationController.
Going Back To Another View Controller - aka Unwinding
This mechanism is only to go back to one of the previous view controller, hence the name unwind segue; it is not design to go to any other view controller that you may have on the Storyboard. Unlike other segues, unwind segues do not instantiate a view controller; they go to an existing view controller only. There is no limit to how far back you can unwind, but the view controller that you are going back to must be one that lies along the chain of view controllers leading to the presentation of the current view controller.
Setting up the unwind segue is slightly less intuitive than setting up a segue that go to another view controller. The steps are:
1. Implement an IBAction method in the view controller that you want to unwind to;
2. Link this method to a button in the view that you want to unwind from.
The following code example demonstrates going from ViewControllerThree to ViewControllerOne by clicking a button in ViewControllerThree.
Add an IBAction: (put this inside the view controller that you want to return or unwind back to)
- (IBAction)backToViewControllerOne:(UIStoryboardSegue *)segue
{
NSLog(@"from segue id: %@", segue.identifier);
}
This method essentially provides the means for ViewControllerThree to talk to ViewControllerOne. The method name (i.e.'backToViewControllerOne' here) can be anything you want so long that it takes one argument of the type UIStoryboardSegue and the return type is IBAction This is all that is required in terms of code (you don't need the NSLog of course). Additional codes are only required if you want to pass values or objects back.
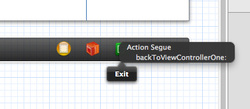
Link it up in StoryBoard:

Sometimes, however, the method name you have entered just won't show up. And this makes it somewhat confusing especially when you first learn to use this unwind segue thing. Not sure why this is the case; but it sure feels like a bug in Xcode. The fix is to simply close the project and reopen it; occasionally, restarting Xcode may also be required.
Once it is all link up, it should work. In the example here, clicking the button will then take you directly back to ViewControllerOne.
For example, you can use code like:
- (IBAction)backToViewControllerOne:(UIStoryboardSegue *)segue
{
NSLog(@"from segue id: %@", segue.identifier);
if ([segue.sourceViewController isKindOfClass:[ViewControllerThree class]]) {
NSLog(@"from view controller three");
ViewControllerThree *vc3 = segue.sourceViewController;
self.textField.text = vc3.name;
}
}
This example simply sets the value of the text field called textField in the current view controller (ViewControllerOne) to the value of a property called 'name' in ViewControllerThree.
The above code uses introspection to determine which view controller the segue is returning from. Introspection is not essential, but can be handy for writing generic code that can handle unwinding from multiple view controllers.
If you need to set the value of the relevant property in ViewControllerThree to a particular value, this is can be done by the prepareForSegue method in ViewControllerThree. Suppose you want to set the property called 'name' above, you can do the following:
- (void)prepareForSegue:(UIStoryboardSegue *)segue sender:(id)sender
{
if ([segue.identifier isEqualToString:@"Vc3ToVc1Segue"]) {
self.name = self.textField.text;
}
}

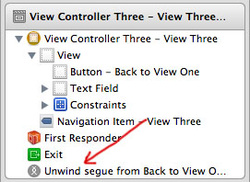
- Vc3ToVc1Segue is the name of the unwind segue. Setting the name of this segue gets a bit confusing. You set the name in the Storyboard by clicking on the segue in the so called 'Document Outline' on the left hand side of the Storyboard. This segue is not shown in the diagrammatic representation. Once the unwind segue is linked, it will be shown in the Document Outline, usually beginning with the words "Unwind segue from...". Clicking on that will allow you to set its name in the attribute inspector.
This simply sets the name property to the value in the text field called 'textField'. Together with the code in the backToViwControllerOne method above, this passes the value of the text field in ViewControllerThree back to ViewControllerOne via the unwind segue. This approach is much simpler than a protocol and delegate based approach.


 RSS Feed
