
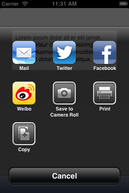
You would have seen the familiar interface on the left if you are using iOS 6. It pops up when you click the action button in many of Apple apps and, increasingly, in many other apps. It is a quick, simple and user-friendly way to present various actions that the user can perform inside an app. It is especially a great way to provide social network integration in your apps.
iOS 6 added a new UIActivityViewController class which makes creating such an interface simple. This post goes through the steps to implement such an interface.
The following example creates a new app called Activity View Example.
Step 1: Create a new Single View Application in xcode
In Xcode, creates a new Single View Application. You can use whatever product name you want, but I am using "ActivityViewExample" here. Fill out the usual fields. I am selecting Universal (I like to use universal when I test out some example codes as I like the flexibility to test with iPad sometimes, but this example will only look at iPhone so you can select iPhone only if you prefer). Select use Storyboards and use ARC.
UIActivityViewController class is only available in iOS 6+. So you need to make sure that the Deployment Target of your app is 6.0+ (this should be the default setting). You can check or change it by selecting the Scode project in the Navigator and then going to the Summary tab.
For this example, I will also be showing how to make the app compatible with iOS 5 or iOS5.1 as well. Of course, for the pre-iOS 6.0 versions, the functionality offered by the UIActivityViewController class won't be available but you can always provide a simple alternative so that your app still function, but with a reduced functionalities. So for this example, I have selected Deployment Target 5.0.
Important: if you are targeting pre-iOS 6 devices, make sure you are not using Autolayout otherwise your app will crash on launch. With the Storyboard selected, go to the File Inspector and de-select the Use Autolayout option.
Step 2: Setup the View in Storyboard
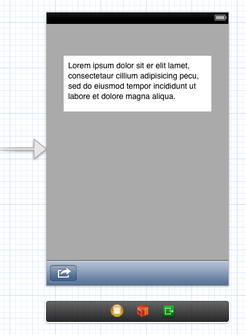
Inside the iPhone storyboard, add in a text view and a toolbar at the bottom. Put some text (whatever you want) in the text view. Change the icon on the toolbar to an Action icon. The result should be as shown on the left.
Next, add an IBOutlet to the text view and an IBAction to the action button. The best way to do this is to select the text view and then Control-drag the from text view to an opened ViewController.h file. Do likewise for the action button. You will end up with the following in the the ViewController.h file:
@property (weak, nonatomic) IBOutlet UITextView *aTextView;
- (IBAction)actionBtnClicked:(id)sender;
And then in the ViewController.m file, add or update the automatically added @synthesize statement to:
@synthesize aTextView = _aTextView;
(I think in the latest version of Xcode, you don't neet this @synthesize statement, as the compiler will create the property as if it is there, but I like to put it there for clarity.)
Step 3: Add the codes for IBAction
Add the following codes inside - (IBAction)actionBtnClicked:(id)sender
if(NSClassFromString(@"UIActivityViewController")!=nil){
[self showActivityViewController];
}else {
[self showActionSheet];
}
This essentially tests whether the UIActivityViewController class is available (it would be if you are using iOS 6+). If it is available, we would use that, otherwise we have to implement a fall back method.
Step 4: Write the code for the showActivityViewController method
Next, we write the codes for the activity view controller.
Before we do that insert the following just before the @implement statement in ViewController.m:
@interface ViewController ()
-(void)showActivityViewController;
-(void)showActionSheet;
@end
This is not essential; but it is my habit and what I consider good practice.
Now, the codes:
-(void)showActivityViewController
{
//-- set up the data objects
NSString *textObject = _aTextView.text;
NSURL *url = [NSURL URLWithString:@"http://www.absoluteripple.com"];
UIImage *image = [UIImage imageNamed:@"heart.jpg"];
NSArray *activityItems = [NSArray arrayWithObjects:textObject, url, image, nil];
//-- initialising the activity view controller
UIActivityViewController *avc = [[UIActivityViewController alloc]
initWithActivityItems:activityItems
applicationActivities:nil];
//-- define the activity view completion handler
avc.completionHandler = ^(NSString *activityType, BOOL completed){
NSLog(@"Activity Type selected: %@", activityType);
if (completed) {
NSLog(@"Selected activity was performed.");
} else {
if (activityType == NULL) {
NSLog(@"User dismissed the view controller without making a selection.");
} else {
NSLog(@"Activity was not performed.");
}
}
};
//-- define activity to be excluded (if any)
avc.excludedActivityTypes = [NSArray arrayWithObjects:UIActivityTypeAssignToContact, nil];
//-- show the activity view controller
[self presentViewController:avc
animated:YES completion:nil];
}
The activityItems is simply an array of data objects on which to perform the activity. In this example, it contains a text object, url object and an image object. The image object here is jpeg file named "heart.jpg" that have been added to xcode project.
The applicationActivities parameter is for you to provide custom services. Here it is set to nil as we are not providing any.
You do not need to implement the activity view completion handler if you do not need it. It simply allows your app to know whether the user has performed a particular activity or not and react to that accordingly if required.
The excludedActivityTypes is an array of ActivityType that you do not want to present to the user. By default, it will display all standard services that can handle the data objects that you included in the activityItems. This standard list includes things like copying items to the pasteboard, posting content to social media sites, sending items via email or SMS. Here, I have excluded adding to contact as an example. Consult the iOS developer reference for other constant string you can use.
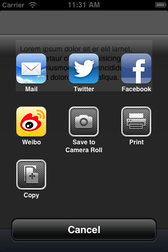
Test it in the Simulator. Make sure you are using iPhone 6.0. When the app appears, click the action button and the following activity view should present itself. If you then click one of the Social network icons, such as Facebook, the standard iOS 6 social network posting interface will appear and it will contain the text you put into the text view, the url and the photo you included in the code.
Add the following codes inside - (IBAction)actionBtnClicked:(id)sender
if(NSClassFromString(@"UIActivityViewController")!=nil){
[self showActivityViewController];
}else {
[self showActionSheet];
}
This essentially tests whether the UIActivityViewController class is available (it would be if you are using iOS 6+). If it is available, we would use that, otherwise we have to implement a fall back method.
Step 4: Write the code for the showActivityViewController method
Next, we write the codes for the activity view controller.
Before we do that insert the following just before the @implement statement in ViewController.m:
@interface ViewController ()
-(void)showActivityViewController;
-(void)showActionSheet;
@end
This is not essential; but it is my habit and what I consider good practice.
Now, the codes:
-(void)showActivityViewController
{
//-- set up the data objects
NSString *textObject = _aTextView.text;
NSURL *url = [NSURL URLWithString:@"http://www.absoluteripple.com"];
UIImage *image = [UIImage imageNamed:@"heart.jpg"];
NSArray *activityItems = [NSArray arrayWithObjects:textObject, url, image, nil];
//-- initialising the activity view controller
UIActivityViewController *avc = [[UIActivityViewController alloc]
initWithActivityItems:activityItems
applicationActivities:nil];
//-- define the activity view completion handler
avc.completionHandler = ^(NSString *activityType, BOOL completed){
NSLog(@"Activity Type selected: %@", activityType);
if (completed) {
NSLog(@"Selected activity was performed.");
} else {
if (activityType == NULL) {
NSLog(@"User dismissed the view controller without making a selection.");
} else {
NSLog(@"Activity was not performed.");
}
}
};
//-- define activity to be excluded (if any)
avc.excludedActivityTypes = [NSArray arrayWithObjects:UIActivityTypeAssignToContact, nil];
//-- show the activity view controller
[self presentViewController:avc
animated:YES completion:nil];
}
The activityItems is simply an array of data objects on which to perform the activity. In this example, it contains a text object, url object and an image object. The image object here is jpeg file named "heart.jpg" that have been added to xcode project.
The applicationActivities parameter is for you to provide custom services. Here it is set to nil as we are not providing any.
You do not need to implement the activity view completion handler if you do not need it. It simply allows your app to know whether the user has performed a particular activity or not and react to that accordingly if required.
The excludedActivityTypes is an array of ActivityType that you do not want to present to the user. By default, it will display all standard services that can handle the data objects that you included in the activityItems. This standard list includes things like copying items to the pasteboard, posting content to social media sites, sending items via email or SMS. Here, I have excluded adding to contact as an example. Consult the iOS developer reference for other constant string you can use.
Test it in the Simulator. Make sure you are using iPhone 6.0. When the app appears, click the action button and the following activity view should present itself. If you then click one of the Social network icons, such as Facebook, the standard iOS 6 social network posting interface will appear and it will contain the text you put into the text view, the url and the photo you included in the code.
Step 5: Write the code for the showActionSheet method
This method deals with the pre-iOS 6.0 situation. The fallback method can be anything you like. In this simple example, an Activity Sheet will be presented as an alternative.
First, make the ViewController conform to the UIActionSheetDelegate by going to the ViewController.h file and update the @interface statement to read as follows:
@interface ABSViewController : UIViewController <UIActionSheetDelegate>
Now the codes:
//-- for compability with pre iOS 6.0
-(void)showActionSheet
{
UIActionSheet *as = [[UIActionSheet alloc]initWithTitle:@"choose"
delegate:self
cancelButtonTitle:@"Cancel"
destructiveButtonTitle:nil
otherButtonTitles:@"Email", nil];
[as showInView:self.view];
}
#pragma mark - UIActionSheet delegate
-(void)actionSheet:(UIActionSheet *)actionSheet clickedButtonAtIndex:(NSInteger)buttonIndex
{
switch (buttonIndex) {
case 0:
NSLog(@"Email");
break;
case 1:
NSLog(@"Cancel");
break;
default:
break;
}
}
This simply print out an NSLog. In real app, you will need to write the code to handle the various choices.
Now, if you can test it in the Simulator. Select iPhone 5.0 or 5.1. When the app appears, click the action button and an action sheet should present itself instead of the activity view.
This is all you need to do. As alluded to above, this class allows you to add custom services that your app may wish to provide. You define this via the applicationActivities parameter when you initalise the activity view controller. The next post will illustrate how to implement this.
 RSS Feed
